

Enabling customer access for users
Now that you have configured your customer access portal, you need to decide how to enable access for your customers. There are two possible methods: Inviting users, or allowing users to register at their own leisure.
Inviting users
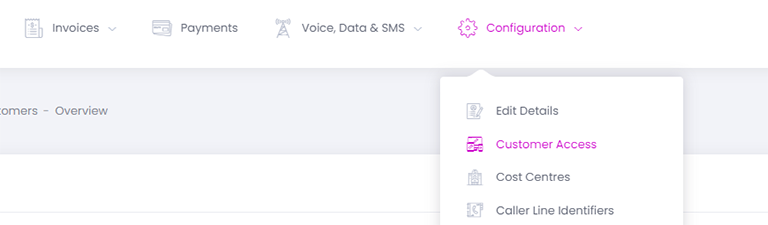
You can explicitly invite users to register and sign in to the customer access portal from within the main Billingbooth Portal. To do this, find the customer in Billingbooth, then under the Configuration menu click on Customer Access:
You will now see a list of all users that have access to the Customer Access portal for this specific customer. From here, you can click on Invite User and that will let you enter an email address.
Inviting the user will send the chosen email address a link for them to go and set up a password on the Customer Access portal. From there, they can then sign in and view all their related data.
Allow customer registration
A more passive way to allow customers to gain access to the Customer Access portal is to allow customer registration. This consists of two steps - Enabling registration via the Customer Access portal configuration, and then enabling the necessary code on your Invoice email template to populate the necessary link for your customer to click on.
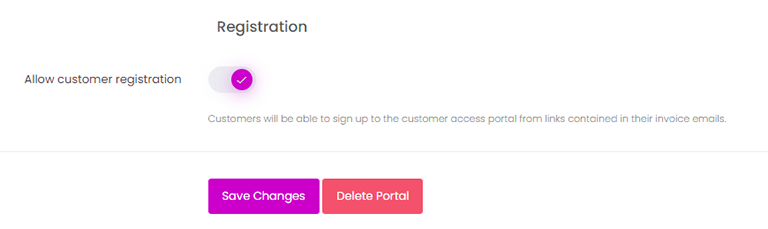
To allow customer registration on the Customer Access portal, go to Settings -> Customer Access, then under the Configuration tab, scroll all the way to the bottom until you see Registration heading, then tick the Allow customer registration checkbox.
Once that's enabled, you should see ensure that your Invoice email template has the necessary code in place to include a link for your customers to register. If you have not customised your Invoice email template and you are using the standard template supplied by Billingbooth, this will already have the necessary code.
If you have customised your email template, please see below.
Customising email templates
You can customise your email templates by going to Settings -> Email Templates. Here a full list of of available email templates are listed.
Invoice email template
Click Edit on the Invoice template name, and by default you should see something like this:
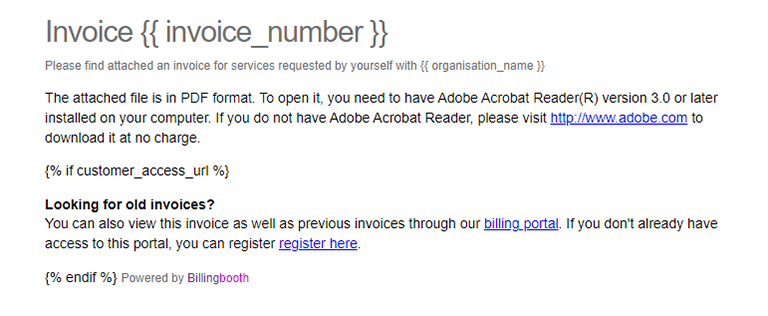
You can see in the above screenshot that there is some Liquid code in place which checks for a customer_access_url variable, and if that is set, it displays some additional bit of content which the customer will see when allow customer registration. There are two variable available for the email template:
| Variable Name | Description |
|---|---|
| customer_access_url | The absolute URL for the customer access portal to sign in |
| customer_access_register_url | A specific URL that, when followed by the user will let them register |
The raw HTML code for the default Invoice email template is:
	{% if customer_access_url %}
	<p>
        <strong>Looking for old invoices?</strong><br/>
        You can also view this invoice as well as previous invoices through our <a target="_blank" href="{{ customer_access_url }}">billing portal</a>. If you don't already have access to this portal, you can register <a target="_blank" href="{{ customer_access_register_url }}">register here</a>.
    </p>
	{% endif %}
Invitiation templates
There are two individual templates that can be customised with the appropriate content when the Customer Access portal is in use.
| Template Name | Description |
|---|---|
| Customer access activation | The email received by the customer when explicitly inviting them to use the Customer Access portal from the Billingbooth portal. |
| Customer access forgotten password | The email received by the customer when they click Forgotten your password? on the Customer Access portal's sign in page. |